How Ontario Lawyers Should Be Recording Their Cash Transactions
Practical guidance on the proper recording and documentation of cash transactions in your Ontario legal practice.
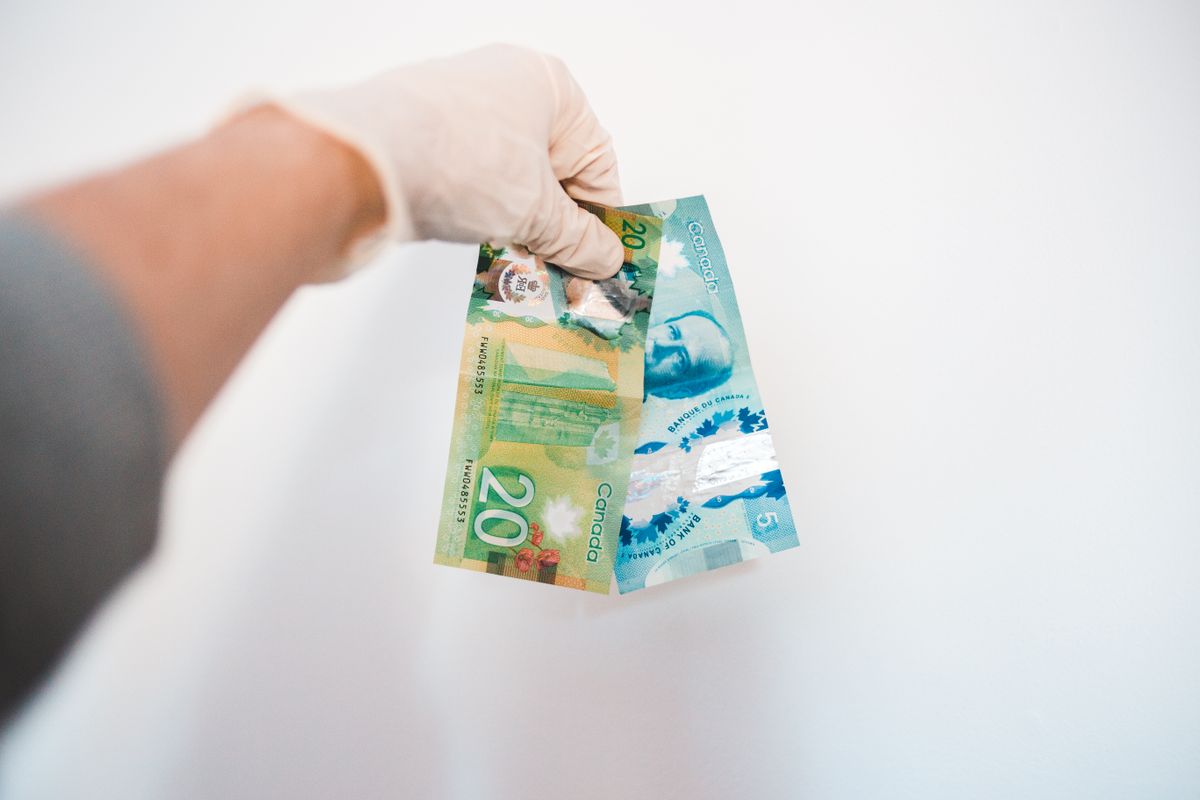
Most Ontario lawyers and paralegals already know that the Law Society of Ontario has rules about how much physical cash that licensees are allowed to accept. You might also be aware that there are some exceptions and fine details to keep in mind.
Remember that cash transactions are regulated by Part 3 and section 19 of By-Law 9. The Law Society of Ontario also has helpful guides on their website to assist licensees in making sense of this part of the By-Law. We've studied the By-Law, and the LSO's guides, and we've worked collaboratively with the LSO to ensure that our platform conforms to the relevant requirements.
In this article, we'll explain how to record a cash transaction into your TrustReq portal. However, before we get into that, we want to mention a couple of things.
First, we recommend that you always perform a cash acceptance pre-check before accepting any cash in your law practice. We have another article called "Ontario lawyers should do this before accepting cash from a client", and we recommend that you read that article first, if you haven't seen it already.
The second thing we'd like to mention is that your standard accounting software likely already has a way of recording money that your business receives, so you might be wondering how recording cash in TrustReq differs from your typical accounting tools. The difference is that every step of the record keeping process on TrustReq is built with By-Law 9 as its central focus. That means peace of mind for you as a legal professional in Ontario, and it also means that the information you'll be recording will be a bit more detailed than your typical accounting software.
Alright, with all of that context out of the way, let's begin.
Starting from your TrustReq dashboard, click on Cash Compliance on the left hand side. Then click on "Record accepted cash".
You'll be taken to another page that has an easy 7-step process, to ensure proper By-Law 9 compliance.
Step 1: Amount
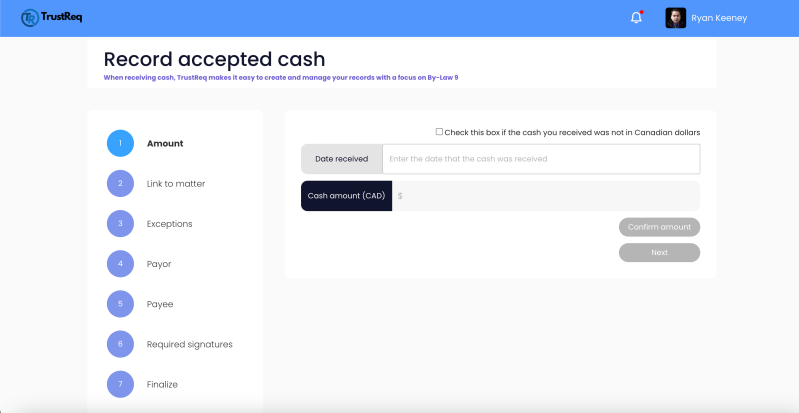
At step 1, you'll need to enter the amount of the cash you received, as well as the date it was received.
If the cash you received was not in Canadian dollars, then you'll need to check the box above the date field. When the box is checked, you'll see some additional fields appear. These additional fields will help you determine the value of the foreign cash in Canadian dollars.
Remember, subsection 2 of section 4 of By-Law 9 requires you to use the Bank of Canada's daily noon rates when performing this conversion. Consequently, you'll see a button that says "View exchange rates". Clicking this button will take you to the Bank of Canada's "daily exchange rates" page. From there, you'll be able to find the exchange rate applicable to your transaction.
To ensure compliance with the By-Law, use the rate that was published in the Bank of Canada's Daily Noon Rates on the exact day you received the cash. If you received the cash on a holiday, use the conversion rate that was in effect on the last business day before the holiday.
Once you have the exchange rate, all you have to do is select the foreign currency from the dropdown menu, enter the amount of foreign currency received, and enter the exchange rate that you obtained from the Bank of Canada's website.
Please note that our calculator accepts exchange rates up to four decimal places, which will usually be sufficient for most scenarios. If the applicable exchange rate uses four decimal places or less, TrustReq will automatically calculate the Canadian dollar equivalent of the foreign cash you received.
However, if the applicable exchange rate published by the Bank of Canada involves more than four decimal places, then you'll need to manually enter the Canadian dollar equivalent of the foreign currency yourself.
To do this, simply click "Manually enter Canadian dollar equivalent". You will see an additional field appear, but the other three fields will remain the same. In the exchange rate field, you can now enter as many decimal places as needed, but no automatic calculation will take place. Simply multiply the amount of the foreign currency by the exchange rate, and enter the product of that multiplication into the field that says "Canadian dollar equivalent".
When you're ready to move onto step 2, click "Confirm amount", and then press "Next".
Step 2: Link to Matter
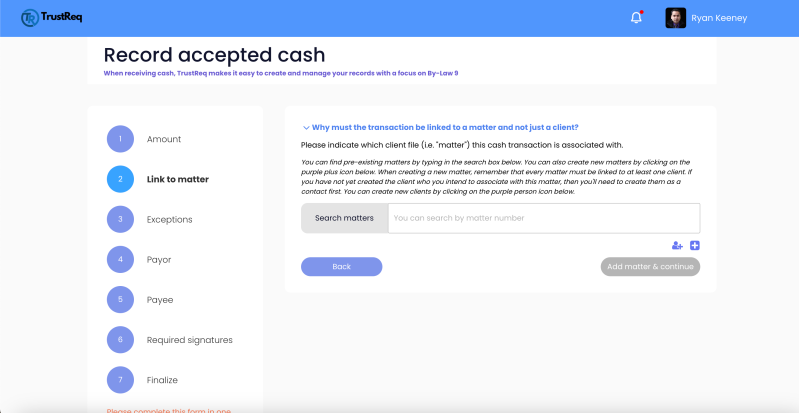
At step 2, you'll need to indicate the matter that is associated with this cash transaction. This might be a point of confusion for some licensees, so remember that, according to the Law Society of Ontario's website, "the cash limit applies to the matter, not the client". So, for example, the same client might have three separate matters, and that client might provide you with cash in each matter that adds up to more than $7,500 across all three matters, but the LSO has stated that this is permitted, as long as the amount of cash in any one single matter does not exceed $7,500 CAD.
You might wonder how TrustReq determines which client is associated with the matter that you indicate. Keep in mind that every matter in TrustReq must be linked to at least one client. This is done when you create a new matter in your TrustReq portal. Therefore, this transaction will be associated with the clients who are listed in your selected matter.
Getting back to how to perform step 2, enter the relevant matter number into the search box. If you have not yet created the relevant matter or the relevant client, then you'll need to do that first by clicking on the small icons below the search box.
When you've located the relevant matter, click the button "Add matter and continue".
Step 3: Exceptions
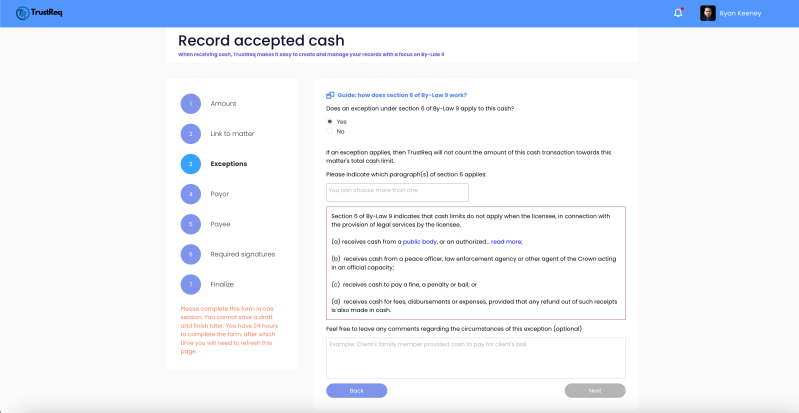
At step 3, TrustReq will ask you if the funds are exempt from the seventy five hundred dollar limit prescribed in By-Law 9. These exceptions can be found at section 6 of the By-Law. Although step 3 is a simple yes or no question, if you are at all unsure about what to answer, we strongly recommend clicking the link that says "How does section 6 of By-Law 9 work?". Doing so will take you to our detailed explanation of section 6 of By-Law 9, which has been sourced from the LSO's website.
If no exception applies, then you can simply select "No" and move on to step 4. However, if an exception does apply, you'll need to select "Yes" and provide more information.
To ensure a detailed audit trail, and to make life easier for the LSO when they review your compliance activities, TrustReq will ask you to specify exactly which exception from section 6 of By-Law 9 applies to this cash transaction. If more than one exception applies, you can indicate all that apply. Optionally, you can leave additional comments regarding the circumstances of this transaction, further explaining why the exception applies to the situation. These comments will be saved in your TrustReq portal's record, and will be reviewable by an LSO auditor along with the rest of your TrustReq data.
Step 4: Payor
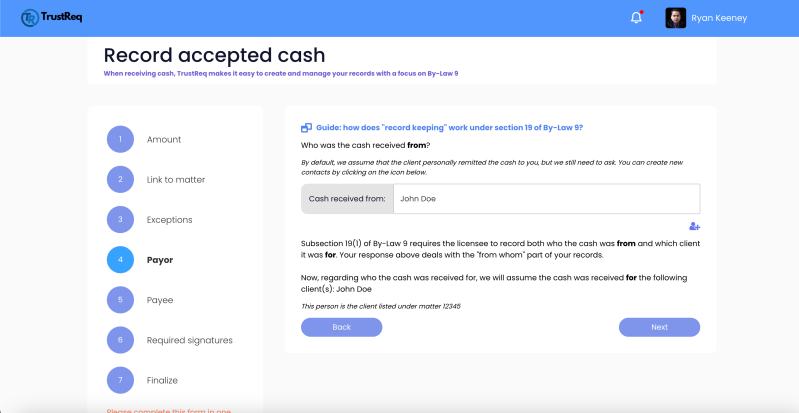
Moving onto step 4, this step ensures that you are compliant with subsection 1 of section 19 of By-Law 9. Specifically, you are required to record both who the cash was "from" and which client it was "for".
Your response at step 4 deals with the "from whom" part of your record keeping. This part is important if someone other than the client is giving you the cash.
As you can imagine, in most circumstances where a client chooses to pay with physical cash, your client will personally remit their cash directly to you for their own matter, so person "from whom" the cash is received, and the person "for whom" the cash is received, will often be the same person, but we are still required to ask you anyway.
If you need to create a new contact in your database at this stage, you can do so by clicking on the icon below the search box.
Now, regarding who the cash was received for, you'll notice that TrustReq doesn't allow you to edit that information. That's because we assume that the cash is for the client identified in the matter you provided earlier. This is to ensure the integrity of your record keeping activity.
Step 5: Payee
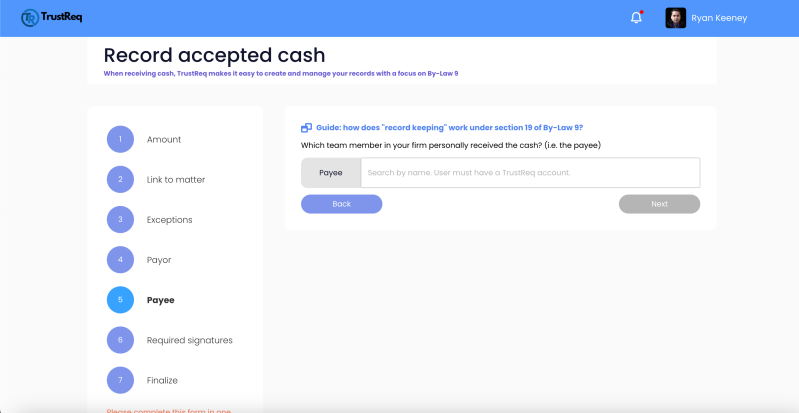
When you're ready to move onto step 5, click "Next".
At this step, you'll be required to indicate which team member in your firm personally received the cash. As you can imagine, it is often the case that a member of the support staff will handle these types of transactions on behalf of the licensee, but it is also often the case that licensees personally receive physical cash without the involvement of support staff. In any event, this information must be recorded. Keep in mind that the individual who received the cash must be a member of your team on TrustReq. If they are not yet a member, then you'll need to add them to your team. If you aren't sure how to do that, then we recommend watching our other video entitled, "How to add a new team member on Trustreq".
Step 6: Required Signatures
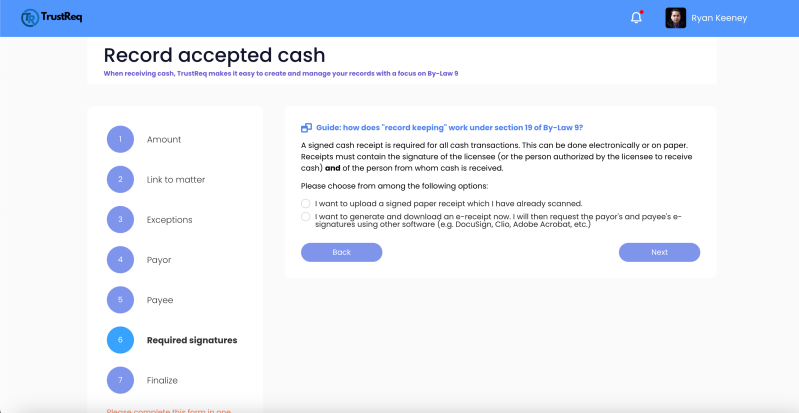
Now, let's move on to step 6. This section has to do with another requirement under section 19 of the By-Law, which states that a signed cash receipt is required for all cash transactions. This can be done electronically or on paper. Receipts must contain the signature of the licensee, or a person authorized by the licensee to receive cash. The receipt must also contain the signature of the person from whom cash is received.
Consequently, TrustReq will require you to choose from one of two options.
The first option is to upload a scanned copy of a paper receipt that complies with all of the signature requirements in the By-Law.
The second option is to confirm that you will generate and download an E receipt now, and that you will then request the payor's and payee's E signatures using other software, such as DocuSign, Cleo, Adobe Acrobat, or another secure E signature provider.
Step 7: Finalize
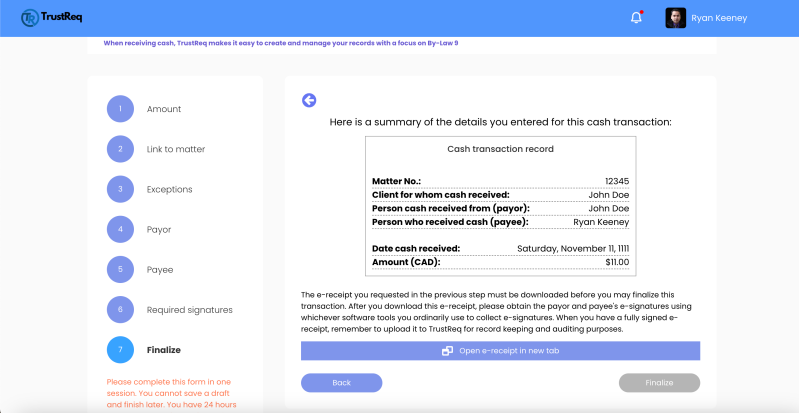
After you've completed step 6, you'll see a preview of your cash transaction record. If you selected option 2 in the previous step, you'll see a link to download the E receipt you requested. This file must be downloaded before TrustReq will permit you to finalize this transaction.
We know that we've put a lot of emphasis on the signature requirements of cash receipts, so we would like to mention that subsection 2 of section 19 of the By-Law states that a licensee is not in breach of subsection 1 if a receipt does not contain the signature of the person "from whom" cash is received, provided that the licensee has made reasonable efforts to obtain that person's signature. We at TrustReq would add that subsection 2 is not meant to be taken as a reason to ignore the requirement to obtain the signature of the person "from whom" the cash was received. We recommend that you document the reasonable efforts that were made to obtain the necessary signature, in all circumstances where the signature was not obtained.
When you're finished with step 7, click "Finalize".
Now, you'll be able to find your newly created cash transaction in various places in your TrustReq portal, including your primary dashboard, and when viewing the relevant matter's details page.
Managing Your Cash Transactions
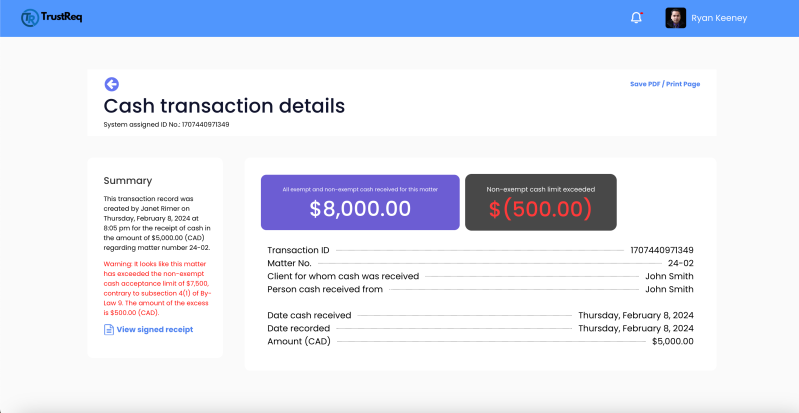
For your convenience, each cash transaction has its own details page, just like when you are inspecting a specific By-Law 9 form. The transaction details page can be found by clicking "Cash compliance" in your primary dashboard, locating the relevant cash transaction in the table, and then clicking "View details" in the far right column.
From here, you can monitor the cash limit status of the relevant matter, upload the required signed receipt, or view a previously uploaded receipt. Receipts can also be uploaded directly from your primary dashboard, without going to the transaction details page.
However, since we're on the topic of the transaction details page, note that the first box indicates the sum total of all exempt and non-exempt cash received in this matter. Don't worry if this number is larger than the regulatory limit, because as we just mentioned, this number includes transactions that were exempt from the cash limit as well as transactions that were not exempt.
The second box indicates the non-exempt cash you can currently accept before reaching the regulatory limit. Make sure this number remains at or above zero. If it drops below zero, this page will contain a warning that this matter's cash records indicate non-compliance with By-Law 9, along with the amount by which the limit was exceeded. These records will also be visible during an audit. To avoid such a situation, make sure to diligently use the cash acceptance pre-check system, and ensure that all cash transactions are properly logged into TrustReq, and that you refuse to accept cash when the pre-check system tells you that a particular transaction will send you over the limit.
Now, let's discuss what happens if you make a mistake while uploading the cash receipt. For example, you might have accidentally uploaded a different receipt, and you wish to correct the error. If you are the primary account owner, or if your account contains the necessary permission level to correct upload errors, then you'll see a button that says "Upload a correction". Clicking this button will cause a popup to appear, which will allow you to upload a new receipt.
Keep in mind that all previously uploaded files will remain visible in a change log for users and auditors. This is to maintain the integrity and transparency of your record keeping activities. Before you upload the correct file, please ensure the new file is accurate and complete before proceeding.
You'll also be required to provide a brief explanation of what this correction is about, and why it is being made.
After you click "Upload and save", you'll see a change log and a list of previous files appear in your cash transaction details page. If this isn't the first change that has been made to this transaction, then this section of the page will have already been visible.
TrustReq is a cloud based service that helps Ontario lawyers and paralegals comply with their regulatory obligations. Start your 14-day free trial today!